
“I don’t think you need to spend a lot of money on headshots for college auditions. After all, you are going to grow and change tremendously over the next four years – ask for the super fancy, luxury headshot session for a graduation gift before you head off to the real world! For now, find a local photographer who might be running a deal.”
Your résumé is a one-page list of your significant theatrical experience—stage roles, training, education—plus your physical description and contact information. Its goal is to help directors know more about you to help them decide if you should be cast. It is recommended that you attach your résumé to the back of your headshot so you can easily make changes. Staple the résumé to the headshot at the center top and bottom, being careful not to staple over any of your text. If you staple just a single corner, it is easy for the résumé to detach from your headshot.
Your headshot is part of the résumé package. Your attitude should be open and friendly, and warmth should radiate from your eyes. One very good photo is all you really need. Headshots should always be 8 x10 and résumés must be cut to fit. Black and white headshots are no longer used; all headshots need to be in color. You can have several headshots: theatrical (more serious), commercial (more smiley) or character (for specific types you can play-optional). Matte is the best finish for headshots, not semigloss. Go to a good photography reproduction place or ask your photographer for recommendations.
Headshot Examples


headshot Overview
What makes up a good headshot:
- Must be in Color (black and white is no longer acceptable)
- Reveals your personality
- Depicts a relaxed, confident you
- Is a picture you are proud to show people
- College Audition headshots are usually best when you are smiling
- Should NOT look like a Glamour Shot. You should look like your headshot in real life - maybe on your best day, sure, but look like you
Dressing for your Headshot:
- Stick with solid colors, and jewel and earth tones are always good. Heavy textures like wool, canvas, and linen are also great, as well as layers.
- Wear a color that best brings out your features
- Wear your hair like you will for live auditions
- Minimal jewelry is acceptable for ladies. Small studs are fine - but big dangly earrings are not!
Need headshots?
Use MacTheatre's recommended headshot photographers:
Headshot Deep Dive
Actors, Dancers and Musicians all need a headshot that best represents them and looks like them on their best day. All performers need one basic headshot that follows these guidelines:
Shot from the shoulders up
Fits 8×10 dimensions
The main focus of the image is the head
Additionally, here are some qualities that make up an excellent headshot:
Looks like you on your very best day
Your hair/makeup/clothing is similar to what you would present in an audition, so it’s easy for them to remember you
Your name should be on the picture. Most commonly, they are printed in the bottom right or left hand corners
No props
A simple white (or neutral) background is best
Pick a color to wear that people tell you that you look great in. If you don’t know, ask family and friends!
Study what a good headshot looks like! Check out the graduating class of your dream school and see what the students’ shots look like
Here are some things to try to avoid in your shot:
These shouldn’t look like a “glamour shot” – do not over-do it with hair and makeup! Simple is best
No distracting jewelry. Simple studs are fine but other than that let your pretty face be the focus!
Avoid distracting backgrounds that pull focus
Cover up! Do not show too much skin
Do not use full body shots for your primary headshot
Additional Shots
If you are a dancer, you will also need to have three-quarter and full body shots. Wear body conscious clothing as auditors are looking at muscle shape, form, etc. These can be shots in which you are demonstrating a specific skill (splits, leaping, etc.) or just a simple pose.
If you are musician, you can also have some shots that showcase you with your instrument. These can be full body or waist up.
Actors typically have two shots in their back pocket – a commercial look and a more theatrical look. The “commercial” look is one with a smile that is a bit more bubbly. The “theatrical” look is exactly what you think, a bit more dramatic! Typically, I recommend a more commercial look for college auditions, but depending on what type of personality you have, it’s up to you!
Permission and Printing
Before you print off your headshots, be sure that you have signed permission from your chosen headshot photographer. This is very important! Respect a photographer’s work and gain the permission you need. Also, many headshot photographers will put a watermark on their photos to avoid printing without their knowledge, so without permission your headshot would be marked.
Be sure to print at a quality print shop. If you google “headshot printing” in your area, there are sure to be places that specialize in this. If not, print a sample at a drugstore near you and inspect the quality.
The most popular printing option for performers is based in NYC and is called Reproductions. You can check them out here for a good example of what to look for:
5 Step Plan for Headshot Photo Shoot Preparation
By Tony Howell
1. Strategize your brand.
Take a moment to write down where you are (present) and where you want to be (future).
The job of your legit media (and subsequent web presence) is to show and tell/sell this ideal, future version of you—to actually make that dream come true.
Beyond honestly brainstorming your brand/business/career through the lenses of present and future, I want you to brainstorm a list of your role models.
Make a list of 5-10 people whose lives, careers or businesses you admire.
2. Research for inspiration.
Now, I want you to search Google for each role model. Visit their websites and social media for how they're officially representing themselves today. Be sure to also visit Google Images for other photos of them. Save or screenshot a collection of images for each role model on your list.
When you've completed the list of role models, take a moment to visit your photographer's website, too. What work of theirs do you like? Save those images to your desktop, too!
3. Organize shot list/vision board
Now, it's time to look for similarities or trends.
You should be able to group many of these images and plan out a structure for your photo shoot—to show your team what you're looking for and exactly why you picked this photographer.
Get more than headshots. Aim for a portfolio. Literally, you're going to need...
Profile Picture (Headshot)
Cover Photos (Lifestyle Images)
Social Posts (Lifestyle, Outtakes and Behind-the-Scenes)
Aim to have strategic indoor and/or outdoor looks, and go after photos with your future goals in mind.
4. Seek styling support.
All of the work on your brand/media/web presence is really about dressing for the job (or future) that you want.
As such, your appearance is important!
I recommend professional help with your wardrobe, hair and makeup. Show your team the images you've gathered as inspiration... but let them riff on these concepts and create something uniquely suited for you.
If you do style your own shoot, I'd recommend you trick your mind by pretending as if you're the professional shopping and styling your role models' next shoot—not your own.
We can often have limited views of ourselves and be very self-critical. Acting as if this shoot is for the website/album/show of your dreams will make the experience more fun and expansive!
Do make sure that you keep the tags/receipts from clothes that you purchase. (This way, you can return them... but you didn't learn that from me.)
5. Improv and have fun.
Remember this is a blueprint to help you get maximum results—a portfolio with a purpose.
Many people (including yours truly) have some phobias about getting in front of the camera. As such, don't be afraid to bring a friend, your own music playlist, take a shot of espresso... whatever it takes for you to "drop in" and just be yourself.
Do all of this preparation so that you can literally just have fun during your shoot! We want your unique light to shine through—genuine looks and smiles at the camera.


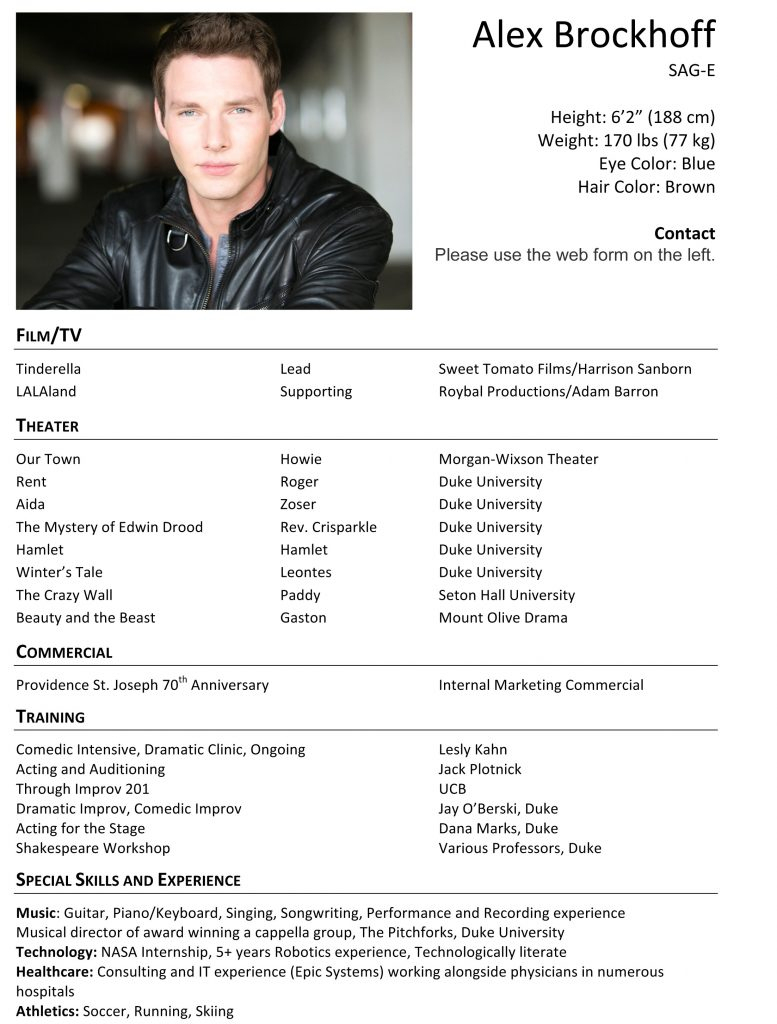
RESUME OVERVIEW
Just as your headshot should be as professional as you can make it, so should your résumé. Your goal is to make it look attractive, clean, clear and complete. Think of your résumé as an audition, albeit an audition on paper, so be sure it is your best work. This is your professional introduction and is crucially important. Get your mentor or a friend to look at it and make suggestions. Revise, reformat and improve. When you have made it as neat and professional as possible, get it printed at a quality duplication service. Save the original on your computer so you can revise and print off fresh copies as needed.
Typical Résumé Format
There is a standard format for résumés that, while not a hard-and-fast rule, is typically followed. You use only one 8 x 10 page, so arrange your space carefully. The format will cover the following categories and typically are in this order.
Contact Information
Start with, logically enough, your name in boldface. Consider adding ―actor‖ or comparable descriptive terms such as "actor-singer-dancer." It is not essential to put your home address or home phone number on your résumé. Instead, create a website and use the URL as your contact information. The best contact information is your agent’s-once you land one. If you do get an agent, reproduce your résumé on their letterhead.
Professional Affiliations
Beneath your name list your professional affiliations such as SAG, AFTRA, Equity.
Physical Description
Give your physical description—height, weight, pronouns, ethnicity, and vocal range. If you’re a singer, specify the notes. Nonsingers will use a generic term like ―baritone or ―alto. Some actors include clothing sizes although it might not always be necessary.
Experience
This is the meat and potatoes of your résumé. It also is the most difficult to organize because space is limited. Subdivide it into ―film,‖ ―television,‖ ―stage,‖ ―voice-overs,‖ ―commercials,‖ and ―other‖ such as trade shows, theme parks, or cruise ships. You’ll want to create columns to organize the categories.
Column One: Name of play or movie.
Column Two: Role you played.
Column Three: Name and location of the theatre, the director’s name. It is common to save space by abbreviating "director" to "Dir." If you appeared with a ―name‖ actor, that can be included here.
Usually the order is theatre credits, film credits, television credits.
If you do commercials, state only whether you have been an on-camera and/or voice-over performer and whether you have a commercial reel or tape, do not list the products. Consider, writing ―list available on request‖ or ―reel available on request.‖ If you do have a reel, consider putting it on YouTube.
Space is at a premium and it is hard to fit everything in, especially if you want to include the name of the theater where you performed. Unknown places will not hold much weight, but known theatres hold a lot of credibility. Actors may tend to exaggerate their experience to make it look more impressive. Be very careful: Theatre is a small village, and you might be surprised when the director says, ―You were in the ATL production of Lear? Hey, I was, too!‖ If you aren't truthful, likely you'll get caught, which is destructive to your reputation (you do not want directors making you the butt of jokes at the local pub, and remember that word spreads easily throughout the small village). Bear in mind that directors understand that young actors can't have accumulated a vast amount of experience, so you really don't need to embellish the facts.
If you are just starting out, list your educational theatre experience. As you gain experience, you can begin replacing the amateur productions with professional appearances. This means you should be prepared to revise your résumé constantly.
Training
Acting, voice, dance, workshops, scene study—where you studied and with whom. If space permits and if the training session was substantially long, consider indicating how long you studied.
Special Talents
List your special skills such as juggling, acrobatics, pantomime, dance, stage combat, ability to speak foreign languages, any instruments that you play, if you can drive a stick shift, dialects and the like.
Theatrical Awards and Honors
List any accolades in your field
Résumé Dos And Don'ts
DO
Staple your résumé to the back of your headshot (both should be 8 x 10)
If you have a lot of projects it is better to list the best ones
Use a format that makes the resume inviting and easy-to-read
Think about your accomplishments, roles you’ve played, characters you’ve become
If possible, tailor your résumé for a specific job, not just a specific industry
Ensure all dates link up and leave no suspicious gaps if you are using a chronological format
Make sure your cover letter is as good as your résumé
Tell the truth
DON’T
Don't use a résumé that is more than one page
Don't staple reviews or clippings to your résumé, they just get in the way
Don't make the type smaller than 10 point, if you have that much experience, edit it down
Don't make up special skills or write things down just so to fill in the special skill area
Don’t list your age on your résumé. You can, however, list your age range. Get some input from others about what they think your age range is. It may be quite different from your actual age
Don’t include your computer proficiency on a theatrical resume, it is not necessary
Never lie about your experience
Resume Examples

SOCIAL MEDIAL
“Personal is professional. Professional is personal. NOTHING ONLINE IS PRIVATE”
Are you ready? I know… if you’re like most of the world, you love it and you hate it, but PLEASE KNOW that the heads of college arts programs are Googling you and checking your social media channels before aceptance offers are made.
Shape your results! Let’s take a look at your profiles. In a way, they are like mini websites. They should always answer the same three questions...
Who are you?
What do you do?
How can I contact you?
What To Post
3 TIPS TO KILL IT ON SOCIAL MEDIA
By Tony Howell
Social media can be overwhelming. You’ve got various coaches telling you what networks to join, how often to post, what to share and during what times. It can be paralyzing—especially if you’re not having fun or seeing the results you want.
Let’s agree that each social platform is different. If you want to excel on individual networks (such as Instagram, Twitter, or YouTube), you have to learn their specific strategies and best practices. You don’t just suddenly become “famous” without a real content strategy—you have to give people a reason to follow you!
The following social strategy is simple and universal. No matter what your goals are or where your talents lie, the following three ideas will help you improve your social game.
1. MODEL YOUR INFLUENCERS.
Why reinvent the wheel? Follow some of your role models. What are they sharing and how does that shape their brand or image? Don’t be afraid to follow influencers in your interests outside of your career. On each social network, follow people who are doing great things.
Tune into what influencers are sharing and how. Then model what works! Ask yourself “What would _____ do?” Test things out and find what works for you.
Note: Be careful not to fall into comparison. This step is about research and inspiration. Remember that you aren’t at these influencers’ career, production, or follower level…yet. Be good to yourself. Furthermore, make sure that your brand/image development is about becoming the best version of you, not a knockoff version of others.
2. FILTER YOUR POSTS.
Social media is a world of quality over quantity. What you share goes out to hundreds and thousands of people. Before you publish, make sure the post is “on brand” for you.
What does that mean? For me, “on brand” and “filtering your posts” is about increased awareness and strategy. Like the filters you use on Instagram, you always want to take the time to shape content before you share it. Take a moment to edit your photos, videos, captions, and other choices.
Does this reflect my best self?
Does this help me and/or others?
Am I sharing this in the best way?
Be careful not to edit and filter so much that it becomes censorship and loses all sense of personality and soul. Definitely keep plenty of authenticity and personality involved. It’s why we “like” you and want to “follow” you!
3. GO FOR IT!
The great thing about social media is that 99.9 percent of the time you can edit or delete your posts. That doesn’t guarantee they go away forever, but you won’t know if something works until you try it!
If you’re feeling passionate and feel the need to share something online, chances are that you’re not alone. Go through steps one and two (to make sure that you’re not going to do yourself a disservice), but it’s absolutely okay to take a risk, make a stand, or reveal something. In fact, those posts can often be the most engaging and successful.
No matter what, how, or where you share things online, remember to always share your best self. These three tips will help!
Model your influencers.
Filter your posts.
Go for it!
FROM THE EXPERTS…
Final Thoughts
In all the media you put out there (whether we’re talking professionally produced materials or selfies on your phone)… make sure that you’re putting things out there in line with your #1 self and your #1 goal. What would make your #1 audience hit "like", "share" or best yet, "follow"?
The big idea is that we want your #1 audience to discover you online... then fast-track you to incredible offline opportunities.